Pages

Showing posts with label baking. Show all posts

Coffee French Macarons with Nutella Buttercream Filling

Sunday, June 14, 2015


I have to say that making French macarons has become an obsession of mine. I just can't get enough of these delicious little cookies. What really gets me is the texture... they're outside shell has a slight crunch as you bite in, but the middle is the perfect chewy and gooey texture where the soft middle of the shells meets the yummy buttercream filling. Perfection!!!

Experimenting with different flavor combinations is my new found favorite hobby, and hands down my new favorite flavor is this this one... Coffee shells with Nutella buttercream filling. This shouldn't really come as a surprise since my husband and I both love drinking coffee, but there's something about coffee and hazelnut that I have always loved together. In fact, the cup of coffee that my husband kindly makes for me every morning has hazelnut creamer in it! Go figure!

The secret ingredient in these babies is finely ground instant espresso powder. I bought mine at target, but didn't skimp on quality. There were several different brands available in the coffee section and my husband even questioned why I needed to select the most expensive option, but I could tell just by looking in the jar that the finer the powder the better the shells would look and taste... and I was right. 


French Macaron Baking Supplies:
Electric mixer (hand/stand mixer will do as long as you have a whisk and regular beater attachments)
Good heavy/thick baking sheets that won't warp in the oven
2-3 Silicone macaron baking sheets (I got these ones from Amazon and love them!)
Silicone spatula
Hand whisk
Kitchen scale
Set of mixing bowls
Sieve or flour sifter
Pastry bag and round tip with attachment

Shells Baking ingredients: 
100g Almond flour (I prefer Mama's Almond Flour Blend. It's much finer than other almond flour/meal)
200g Powdered/confectioner's sugar
40g plain granulated sugar
2 tablespoons fine instant espresso powder
3 egg whites at room temperature (approximately 100g)

Nutella Buttercream ingredients:
3/4 cup of butter
1/2 cup of Nutella
Pinch of salt
3/4 cup of confectioners' sugar
FYI- this will yield a large amount of filling and you will have extra. I recommend saving it in a Ziploc in your fridge for your next batch of macarons. Just work the filling in the bag with your hands to warm it up or bring it to room temp before you'll need it next.

Let's begin!

I always start by using my flour sifter to sieve the measured almond flour and powdered sugar together. Next, I whisked in the 2T of instant espresso powder. Set the powder mixture aside and you can separate the egg whites, add the pinch of salt and begin whipping. 


Once you get a foamy texture, start adding in the 40g of granulated sugar. I usually do this in 3 installments and whip the whites into a meringue. This will take a while, but be careful not to over whip or your macarons will be dry and crack. Just keep whipping and checking until you have slightly stiff glossy peaks [shown below].


Once your meringue is finished, put aside your electric whisk and get out your spatula. You will gradually begin to fold in the dry mixture into your meringue. It's important to add this incrementally and mix in each portion well before adding another. I usually do this in 3 portions, but again it is important not to OVER mix in this stage as well. This is how it looks when it starts to come together.

And this is how it looks when I'm done. This is what you want... smooth slow flowing lava texture. A good test is to check the consistency of the batter by lifting up your spatula. Does the batter flow slowly in ribbons or in chunky globs? You want ribbons :)

Finally, it's time get out your trusty pastry bag and round tip. I like to prop mine up in a tall flower vase so I can pour the batter into the bag with one hand holding the bowl and the other scraping the sides with the spatula. All that's left is place the silicone molds on your baking sheets and pipe into the molds. 

Tap the sheet on your counter to let any air bubbles loose and let these babies dry for 30 minutes. 

***That reminds me... don't try to make this on a humid or rainy day. The shells won't dry correctly and it will not work! You can try countering the weather by letting them air dry for an hour or more, but I recommend just waiting until the weather is less ideal.***

Most standard French macaron recipes will tell you to bake them at 325 deg F for 10 minutes, but you should take into consideration if your oven runs hotter/colder than others. I happen to know that mine runs hot, so I set the temp to 315 deg F for the first batch, and for the 2nd and 3rd trays I put a wooden spoon handle in the oven door. I find this method works best for me, because my 2nd and 3rd batches were repeatedly coming out cracked from my oven being on longer and therefore too hot. I mean just the whole sheet of them would be cracked! Horrible!!! The wooden spoon method has proven itself several times over to me, so now I never bake my subsequent batches without it. 

Once the cookies are 100% cooled, you can start to carefully peel them off the silicone mats. I have accidentally under baked mine before and found out during this phase when the cookies don't come off the mat. Instead the tops pull off and you ruin the beautiful macaron feet. If this happens to you, what I do is put the cookies back on the baking sheet and back in the oven for a few more minutes at a lower temp. For me, that's about 300-305 deg F. Keep a close eye on them though, because the last thing you want is for them to burn.

Divide your cookie shells evenly into two groups: tops and bottoms and beginning pipping. 

Once you have half of all your shells filled, begin putting the shells together and press lightly to make sure they're secure. Most recipes then say to store them in the fridge overnight before tasting, but to be honest I always eat the rejects (cracked ones) right away and store the pretty ones for guests in the fridge :)


And there you have it, my favorite macaron flavor du jour! Hope you give them a try and if you do leave me a comment below or use #blissfullyevercrafter.

Thanks guys!
Blissfully Ever Crafting,
Jennifer Lynn


Green Tea Guava Buttercream Macarons

Tuesday, May 12, 2015


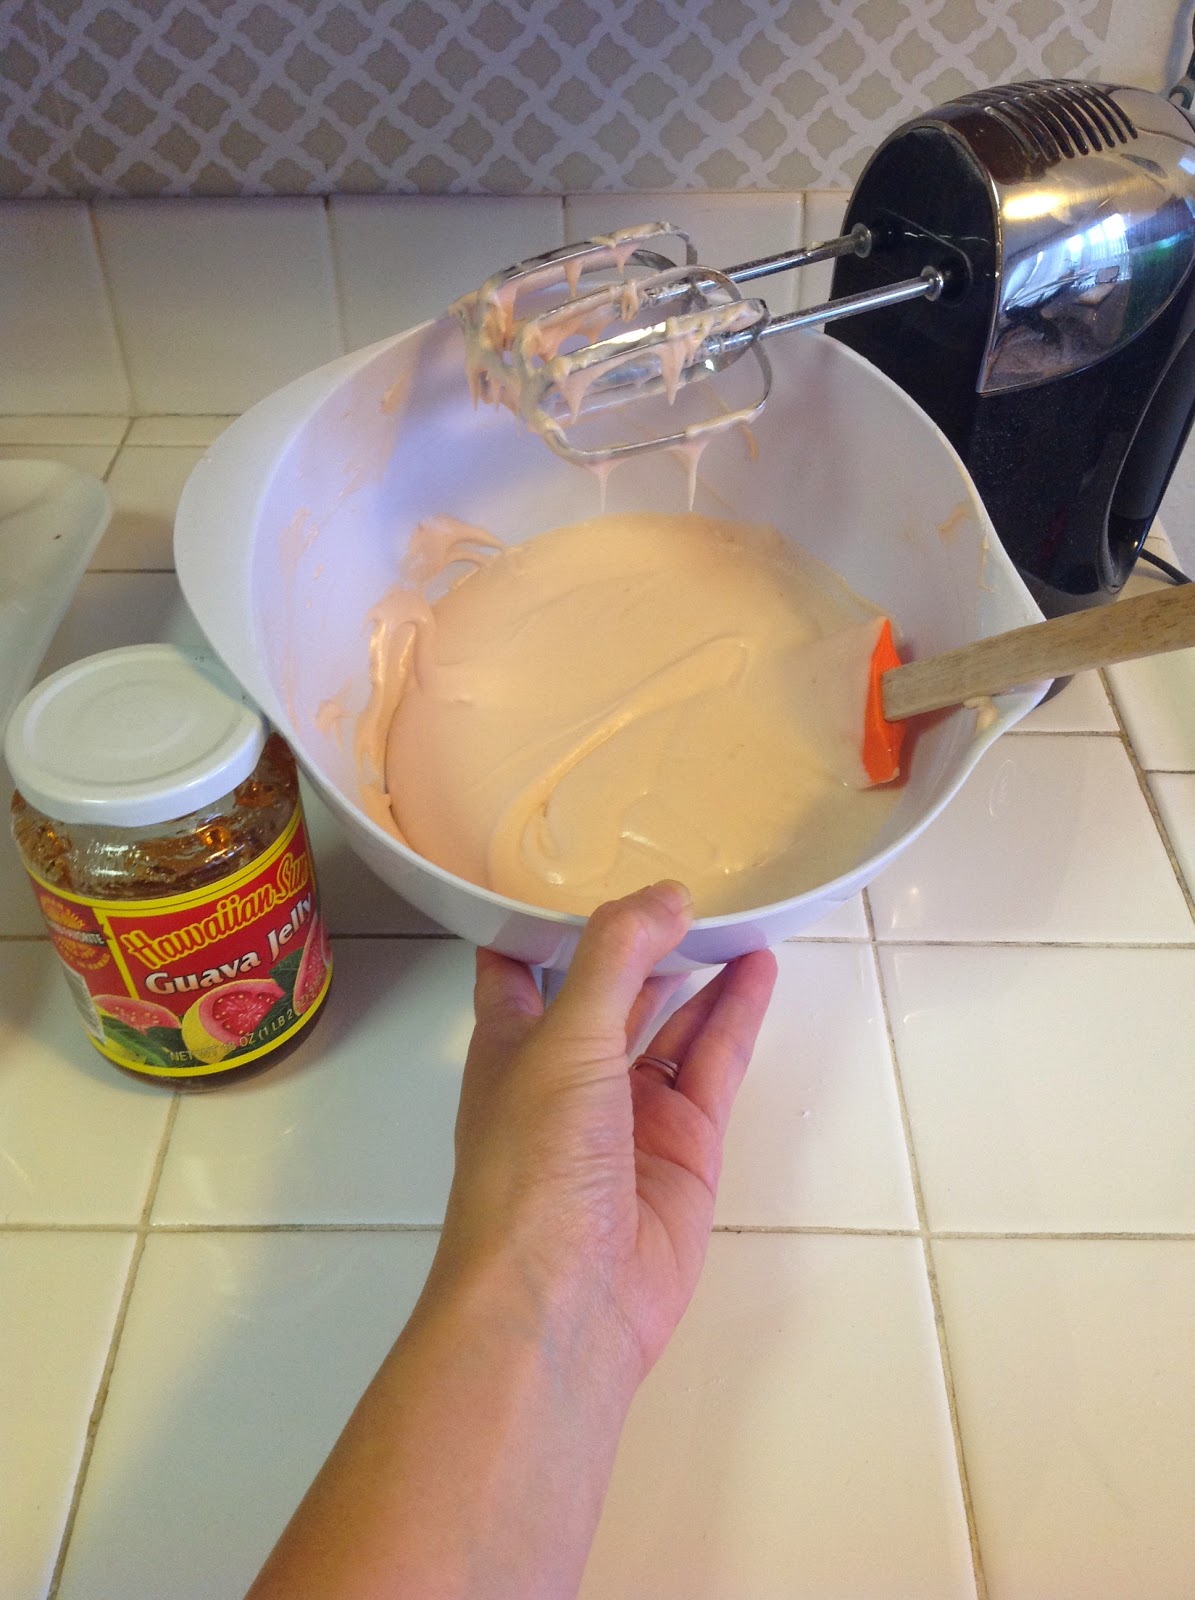
So frankly, these are just as delicious as they look. It all started with getting this delicious Hawaiian Sun Guava Jelly as a gift from my co-worker. She bought it at this local Hawaiian market in San Mateo called the Takahashi Market. 

Next I found some Green Tea Matcha Powder at our local Trader Joes. This can be purchased at almost any grocery store, just look in the tea or coffee section. If your Safeway or large brand grocer doesn't have it, check your local Whole Foods or equivalent store, they should have something very close. 

The rest is essentially following the typical French Macaron recipe:

Electric mixer (hand/stand mixer will do as long as you have a whisk and regular beater attachments)
Good heavy/thick baking sheets that won't warp in the oven
2-3 Silicone macaron baking sheets (I got these ones from Amazon and love them!)
Silicone spatula
Hand whisk
Kitchen scale
Set of mixing bowls
Sieve or flour sifter
Pastry bag and round tip with attachment

Shells Baking ingredients: 
100g Almond flour (I prefer Mama's Almond Flour Blend. It's much finer than other almond flour/meal)
200g Powdered/confectioner's sugar
40g plain sugar
2 tablespoons Green Tea Matcha Powder
3 egg whites at room temperature (approximately 100g)
Green Food coloring gel (optional)


After sifting the measured almond flour and powdered sugar together, I whisked in the green tea powder. Set the powder mix aside and you can separate the egg whites, add the pinch of salt, and whip the whites into a meringue. Just before they're reached their stiff peaks, I added a drop of green food coloring.  


Next you can start what is called the "macaronage" phase. To incorporate the dry mix into the meringue, you can put away your electric mixer, you will only need your silicone spatula. Add about 1/4 - 1/3 of the dry mix into your meringue bowl and begin to fold in the mixture. Scrape around the bowl and then press down, but be sure to make sweeping scrapes from the bottom up. You don't want to end up with a big dry glob on the bottom. Keep adding increments of the dry mixture and folding in between each addition. In the end, you should have a batter the texture of lava. **Again in this step it's important not to under-mix or over-mix the batter. It should be smooth with slow flowing ribbons when you pick up the spatula**

This is what your batter should look like when you've reached the ideal "lava" texture.

Next you can get to piping!

I also found this fun flower/star mold on Amazon as well! Fair warning, it's a little more tricky to pipe these ones, so if you're a beginning just stick to the rounds.


Let them rest at room temperature in the molds for 30 minutes. When the 30 min are close to up, start pre-heating your oven to 325 deg F. While it's pre-heating, you can whip together the filling!
Guava Buttercream Filling:
1 stick unsalted butter (softened/room temp)
250g powdered sugar
1/2 jar of Guava Jam (or your favorite jam to taste!)
1 drop of pink gel food coloring (optional)

Beat the soft or room temperature butter with your mixer until it's creamy and then you can start to add in gradual amounts of the powdered sugar. Once it's all incorporated, you can start adding in increments of the jam. I kept adding in heaping spatulas full of it until about half of it was mixed in. I added a single drop of pink gel food coloring to really enhance the flavor. 


Here's the final product before I spatulaed it into a piping bag and keeping it in the fridge before the shells were ready. Of course the final steps are the same as my Cookie Dough French Macaron post when you wait until they're completely cool, remove them from the silicone mats, and put them together with some yummy buttercream filling. 


 If you decide to give my recipe a try, leave a comment below or you can use #blissfullyevercrafter so I can follow along! Thanks for reading!

Blissfullly Ever Crafting,
Jennifer Lynn

My love affair with French macarons... Cookie Dough & Cookie Butter Filling!

Monday, April 20, 2015


Ahh the perfect French macaron... 

I know that it may seem daunting, but with some practice and the right baking tools nearly ANYONE can make their own french macrons from scratch at home and I promise they will taste so much better than any macarons you can buy in a store. 

I started experimenting with baking macarons (the French method... not the Italian method which requires a candy melting thermometer and frankly just scares me) to prepare for my cousin's bridal shower. I planned on baking 120 of them the day before the shower after flying to Boston, but had to scrap the whole plan after many delays [detailed in my post 4/12/15].  I have to say that I honestly had two totally failed batches before I was able to get those glorious little "feet" that are the markings of a perfectly baked macaron. The first batch I over mixed the batter and got flat discs and the second batch I overcompensated and under-mixed the batter yielding cracked shells. Then finally, like Goldilocks the third one was just right and you're in luck because I'm here to share with you my macaron secrets to success! 

First of all you will need the correct baking tools and ingredients. I can not emphasize enough that if you try to "make do" with less superior tools/ingredients you will notice the difference. You will need:

Electric mixer (hand/stand mixer will do as long as you have a whisk and regular beater attachments)
Good heavy/thick baking sheets that won't warp in the oven
2-3 Silicone macaron baking sheets (I got these ones from Amazon and love them!)
Silicone spatula
Hand whisk
Kitchen scale
Set of mixing bowls
Sieve or flour sifter
Pastry bag and round tip with attachment


Shells Baking ingredients: 
100g Almond flour (I prefer Mama's Almond Flour Blend. It's much finer than other almond flours)
200g Powdered/confectioner's sugar
40g plain sugar
2 tablespoons cocoa powder (optional)
3 egg whites at room temperature (approximately 100g)


Cookie Dough Buttercream and Cookie Butter filling:
1/4c room temperature butter
2T granulated plain white sugar
1/4c packed light brown sugar
3/8c all-purpose flour
Pinch of salt
1/8t almond extract 
1/8t vanilla extract
1-2T heavy cream (I use hazelnut coffee creamer)
1 oz dark chocolate shavings
1/4c - 1/2c Trader Joe's Cookie Butter (to taste)

Okay so now you have everything you need, and it's time to start prepping. 

Most macaron recipes call for room temp eggs which means leaving them out overnight or all day... But who has time for that?! Instead, I put my 3 eggs in a tall glass of hot- warm tap water. I do this step first and by the time you're done measuring the dry ingredients they're usually good to go. 


Now, set your medium mixing bowl on your kitchen scale and tare it (reset so the screen says zero). Slowly begin pouring in the flour until it says 200g EXACTLY. If you over pour just remove small amounts with a spoon until you're there. Then tare the scale again and begin adding your powdered sugar until you reach 100g. Also in a small sauce bowl measure out 40g of plain sugar and set it aside for the eggs. Next, place your sifter in the large mixing bowl and scoop some of the dry ingredients into the sifter. 


If you don't have a flour sifter, I have found that using a kitchen sieve with a silicone spatula to push things through works remarkably well. Once you've sifted all of the dry ingredients together, you can sift in the cocoa powder. Lastly, I use my hand whisk to mix in the cocoa. 

At this point it's time to check on your eggs. They will feel warm to the touch when you take them out of their bath and just pat them dry with your towel. Now make sure that your largest mixing bowl is clean and dry. You're going to make the meringue in this bowl so it can't be dirty or moist (I've even used my hair dryer during this phase before if I can't get it dry in time). Now you can start separating your egg yolks in this bowl and discard the yolks or save them for something else if you wish. 

Once all three are separated, you can start your electric whisk and keep it on until you start to see a foamy texture. Stop the mixer and slowly add some of the 40g of plain sugar.  


Thoroughly whisk in each portion of the sugar before adding more. You'll know you're done and have your meringue when you have glossy white peaks. **Be careful here not to over beat the eggs or your shells may be too dry and crack**

Next you can start what is called the "macaronage" phase. To incorporate the dry mix into the meringue, you can put away your electric mixer, you will only need your silicone spatula. Add about 1/4 - 1/3 of the dry mix into your meringue bowl and begin to fold in the mixture. Scrape around the bowl and then press down, but be sure to make sweeping scrapes from the bottom up. You don't want to end up with a big dry glob on the bottom. Keep adding increments of the dry mixture and folding in between each addition. In the end, you should have a batter the texture of lava. **Again in this step it's important not to under-mix or over-mix the batter. It should be smooth with slow flowing ribbons when you pick up the spatula**

Once the lava texture is achieved, stop mixing and get your piping bag ready. I like to prop it up in the same glass that I warmed the eggs in and pour directly in. Honestly, at this point I usually will shout out to my hubby for an extra hand to hold the bag upright. 
Now it's time to practice your piping skills! Make sure you have the silicone macaron mats ready to go on your good baking sheets on a flat and level surface. You will see that is a smaller circle inside each circular mold. Start slowly filling each round with even pressure just past the inner ring. Then wait and watch as the batter slowly flows out to fill the mold. Tapping the sheet on the counter helps to spread it out so you can gauge if you pipped enough/too much batter. Continue to fill all of the molds and don't forget to tap the sheet on the counter when you're done. Don't be delicate about it either! You want all of those little air bubbles out so they don't ruin your pretty smooth shells. 


Now you let them rest at room temperature for 30 minutes. I usually will set a timer on my phone but still hang around them and watch as I clean up the kitchen. If you keep spying, you can catch the few molds that spill over. 

I correct this with a plastic straw and slowly suck up the excess batter. You can also use the other end of the straw and pinch it narrow to use as a tiny trowel to clean up in between the molds. 


Now onto the filling:

Beat the room temp butter and white & brown sugar until fluffy. Next, add in the flour and beat again until incorporated. Then add the wet ingredients (almond and vanilla extract and cream/creamer) and mix. Add in the Trader Joe's Cookie Butter and beat again until incorporated. **At this point you should check your timer. If it's almost been 30 minutes then turn on your oven to preheat to 325 degrees F.**


Lastly, you can add in the dark chocolate shavings. If you don't have shavings, you can make them yourself with a good quality bar of chocolate and a cheese grater, but watch your fingers!
Set the filling aside in a pastry bag or gallon Ziploc bag and leave at room temperature. 

By this time, your timer should have gone off and you should have your first sheet of shells in the oven. Each sheet should bake for about 8 - 10 minutes depending on your oven. Keep a close eye on them, but don't open and close the oven too much or you'll piss off the sensitive little buggers. If you do peek at them you should see these beautiful little feet forming!
(Please excuse my dirty old oven)

Once the new timer goes off, take them out and slide the silicone mat onto a cooling rack immediately. Don't touch them until they have cooled completely and put your next batch in. When you have a set that is completely cool the touch, you can carefully start working around the edges and peeling back the silicone mat. I prefer to do it this way to avoid pulling the tops off of the feet. 


You're almost there!

Then, all you have to do is pair up your shells and pipe the filling into half of them. 


Carefully press the two shells together and voila! C'est magnifique! 


Now technically, I should mention that you should store them in an airtight container in your fridge overnight, then let them come to room temperature for optimal texture and enjoyment. However, I have to admit that my husband and I always eat the rejects right away [not pictured here]. 

I hope you feel like you can try making these deliciously crunchy, chewy, and goey French treats on your own now. I can guarantee you that they won't taste anything like the ones you can buy frozen or even from a local bakery (unless you live in Paris of course), so I really encourage you all to give it a go. It's an experience your taste buds will thank you for!

Blissfully Ever Crafting,
jennifer lynn


Free printable from Chicfetti.com !


site design by designer blogs